Accessing cross-account resources
In some cases, you might want to interact with AWS resources in an AWS account that has no Conveyor cluster. This might be the case when you need to process data from another team/department, who have their own AWS account. If you want to use Conveyor for processing but keep the data on the other teams AWS account, cross-account access is the right fit for you. This page describes the necessary steps that are involved in setting up cross-account access to AWS resources.
Throughout this tutorial we will refer to:
- Conveyor AWS account that contains the Conveyor cluster and will execute your job
- Non-Conveyor AWS account, which contains AWS resources (e.g. s3 bucket, glue database,...) that you want to access from your job running on the Conveyor cluster.
This how-to guide has the following sections:
- Configure an IAM identity provider in the non-conveyor account
- Create an IAM role in the non-conveyor account
- Use the created IAM role in your Conveyor jobs
Configure an IAM identity provider
In order to be able to create IAM roles in the non-conveyor account that can be assumed by jobs running on the Conveyor cluster, you will need to create an IAM OIDC provider. The IAM OIDC provider is used in the trust relationship of IAM roles and must be defined in the same AWS account as your role, which is in this case the non-conveyor account.
You do not need to create an IAM OIDC provider for the AWS account where Conveyor runs, as that is done during the installation of Conveyor.
One way to set up the OIDC provider, is to use the following Terraform code:
resource "aws_iam_openid_connect_provider" "conveyor-openid-connect-provider" {
  url            = "<kubernetes-oidc-url>"
  client_id_list = ["sts.amazonaws.com"]

  # The thumbprint is the hashed root CA that doesn't change for another 10+ years
  # and it is the same across all regions. Here is a link on how to find it:
  # https://docs.aws.amazon.com/IAM/latest/UserGuide/id_roles_providers_create_oidc_verify-thumbprint.html
  thumbprint_list = ["9e99a48a9960b14926bb7f3b02e22da2b0ab7280"]
}
If you want to create the OIDC in the UI, you search for identity providers in the AWS console search box.
On the identity providers page, click on add provider, and toggle openId connect which results in the following screen:

The only field that you need to fill in is the oidc url of the Conveyor cluster. You can find this information in one of the following ways:
- CLI:
conveyor cluster listcommand - Terraform:
clusterdatasource
Create an IAM role that can be used cross-account
The second step in this tutorial is to create an IAM role in the non-conveyor account, which has access to the AWS resources that you want to use.
locals {
  project_name = "cross-account-sample"
  uuid_pattern = "????????-????-????-????-????????????"
  conveyor_openid_connect_provider_url = "TODO"
  conveyor_openid_connect_provider_arn = "TODO"
  conveyor_environment = "dev"
}

resource "aws_iam_role" "default" {
  name               = "${local.project_name}-${local.conveyor_environment}"
  assume_role_policy = data.aws_iam_policy_document.default.json
}

data "aws_iam_policy_document" "default" {
  statement {
    actions = ["sts:AssumeRoleWithWebIdentity"]
    effect  = "Allow"

    condition {
      test     = "StringLike"
      variable = "${replace(local.conveyor_openid_connect_provider_url, "https://", "")}:sub"
      values   = [
        "system:serviceaccount:${local.conveyor_environment}:${replace(local.project_name, "_", ".")}-${local.uuid_pattern}"
      ]
    }

    principals {
      identifiers = [local.conveyor_openid_connect_provider_arn]
      type        = "Federated"
    }
  }
}
In the previous snippet, there are two variables that need to be filled in using the IAM OIDC provider created in step 1 of this how-to guide.
- conveyor_openid_connect_provider_url: should be the url from the openid connect provider
- conveyor_openid_connect_provider_arn: should be the arn of the openid connect provider
When using terraform, you can easily get these attributes from the aws_iam_openid_connect_provider resource
as described in the Terraform documentation.
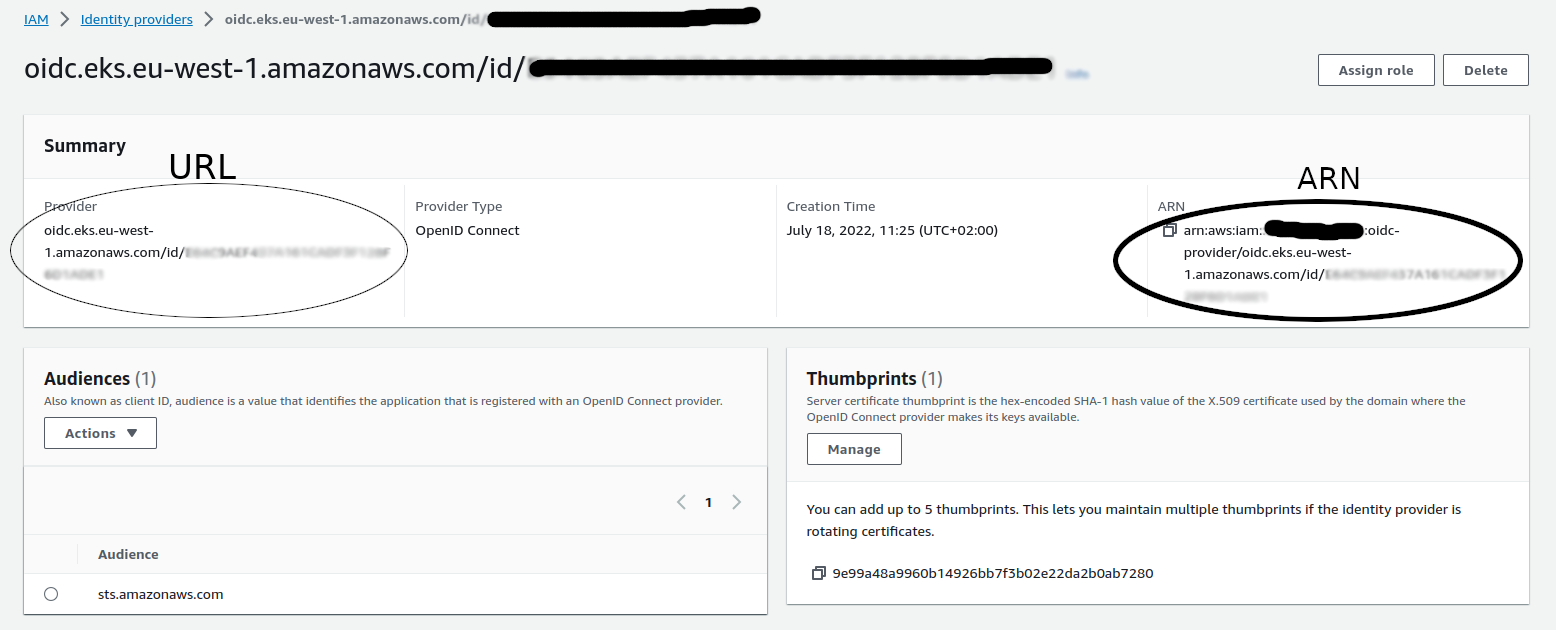
If you prefer the AWS console, you can also find these properties by searching identity providers in the search box.
On the overview page click on the oidc provider link of the newly created oidc provider.
The provider detail page should look as follows, from which you should copy the URL and ARN as specified:
Next to the assume role policy, you should also attach additional policies that specify the resources that the IAM role should have access to. This is where you specify that the role has access to a s3 bucket or glue,...
Use the created IAM role in your Conveyor jobs
Finally, after having created the IAM role, it is time to use it in a Conveyor job.
All Conveyor objects (e.g. ides, Spark jobs, Container jobs,...), support specifying an aws_role.
Since you now want to attach an IAM role from another AWS account, you must specify the full arn of the role instead of only the role name.
This is needed because if only a role name is specified, Conveyor constructs the full arn based on the Conveyor AWS account.
Here is an example that specifies the full arn for an Airflow container job, but the mechanism is the same for all other Conveyor operators.
from conveyor.operators import ConveyorContainerOperatorV2

ConveyorContainerOperatorV2(
    task_id=f"ingest-weather-v2-cross-account",
    arguments=["--date", "{{ ds }}"],
    aws_role="arn:aws:iam::<account-id>:role/<role-name>",
    instance_type='mx_nano',
)