Customizing your IDE
You have the possibility to configure your IDE (e.g. install VS Code plugins, install OS packages, ...) in a YAML specification. Using a YAML specification allows you to tailor the IDE to your needs.
The IDE configuration can be configured in your source code, using the ide.yaml in the root of your Conveyor project,
or you can specify the yaml configuration using the project settings page in the Conveyor UI.
This configuration is applied on top of the base image selected for your project. See the base image docs for more information about base images.
In this how-to guide, we will explain:
- When is a build required
- Adding a VS Code extension to your IDE
- Installing a package with apt
- Installing a custom tool using bash
- Running tasks at IDE startup
- Customize VS Code settings
When is a build required
Building this custom IDE image can take some time, which is why Conveyor caches them for up to 7 days.
This means you can reuse the cached image instead of waiting on the creation for your custom IDE.
We reuse a cached IDE image when the ide.yaml is the same as a previously created one.
New builds are triggered:
- When you create a new IDE for a project and the yaml configuration is different from the cached one.
- When the base image is updated (e.g. a new release of Conveyor will update the default base image).
When resuming a suspended IDE, no builds are triggered because we launch the IDE from a saved snapshot.
Adding a VS Code extension
To install a VS Code extension, you first have to choose which one(s) you want. Extensions can be found on https://open-vsx.org/, and include tools such as a parquet viewer.
You can only install extensions using the Open VSX marketplace.
Use https://open-vsx.org/ instead of https://marketplace.visualstudio.com/ when looking for the available extensions.
Why do we need Open VSX?
VS Code Browser is prohibited from accessing the Microsoft VS Code Extensions marketplace.
Microsoft only permits use of their marketplace via Microsoft’s publicly supported interfaces
(see their ToS section 1f)
and this restriction applies to the Conveyor VS Code Browser integration.
Installing your first extension
We will use the parquet-viewer extension for this example.
To get started, create the ide.yaml file in the root of your project as follows:
vscode:
  extensions:
    - dvirtz.parquet-viewer
The dvirtz.parquet-viewer specifies the extension we want to install.
To test out this customized IDE you can now run:
conveyor ide create --env YOURENV
This will:
- Create a customized IDE with the spec we just provided, which is cached for future reference.
- Once that IDE image is created, it will be used to launch a new IDE from.
conveyor ide create will be smart about starting from a cached image or not.
When you or someone else has already built a customized IDE using the same ide.yaml configuration,
the cache will be reused.
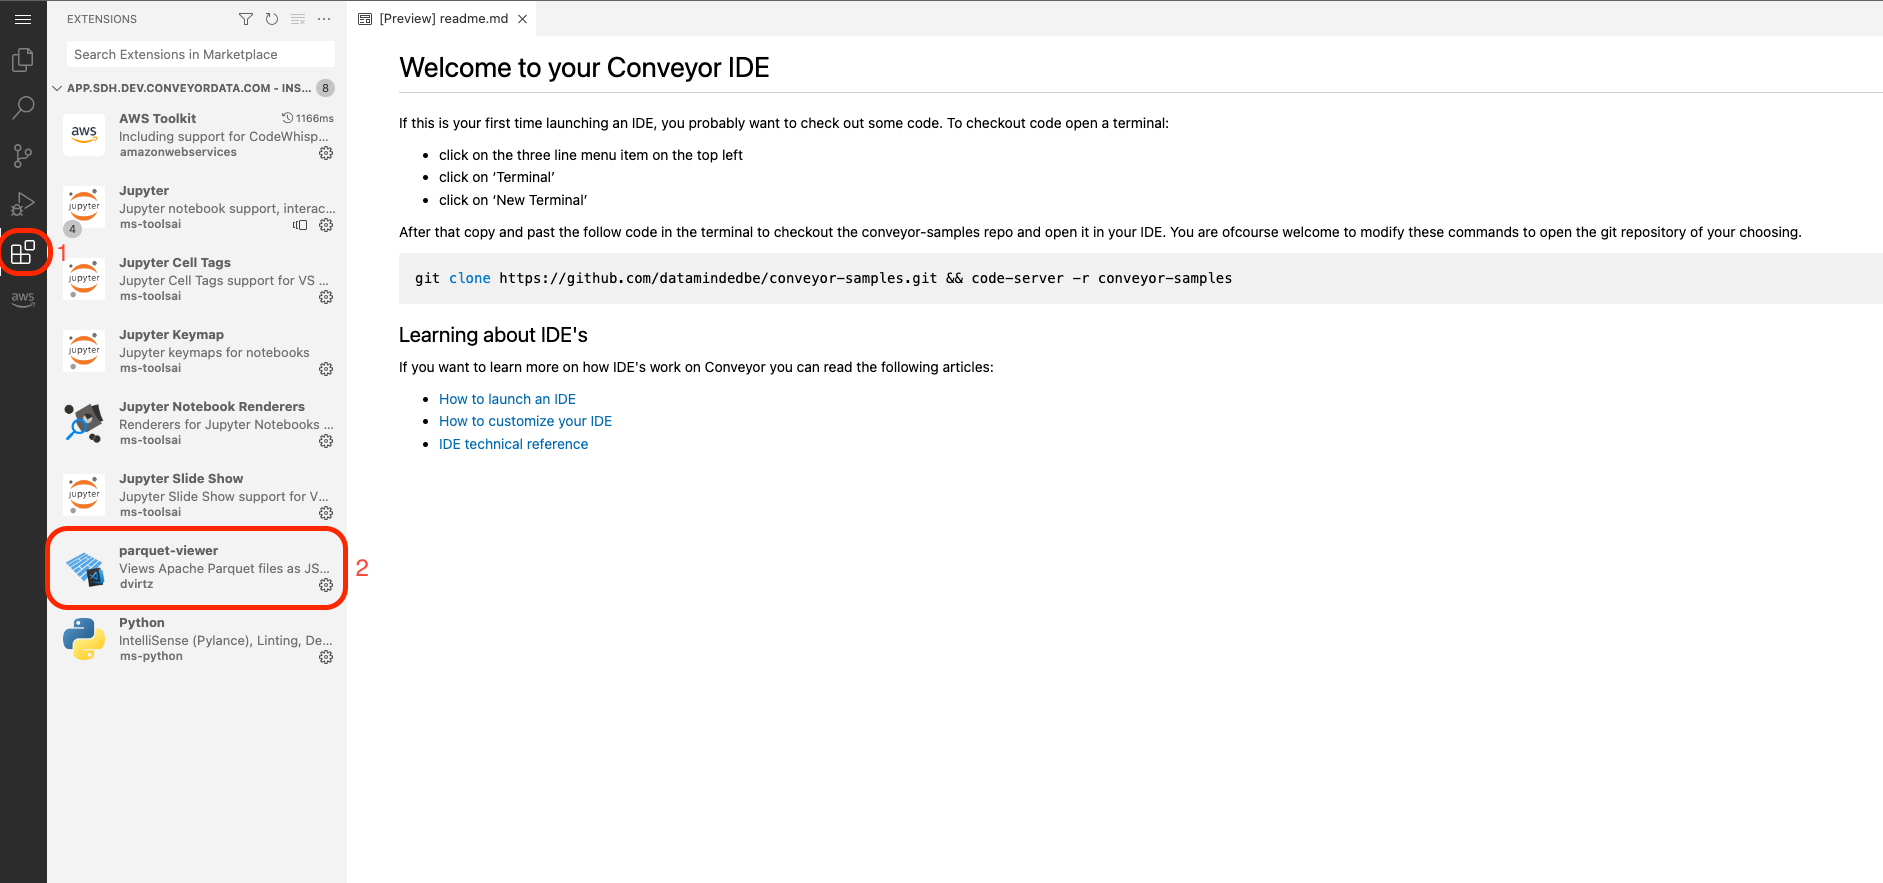
When the IDE is running, we can select the list of extensions on the left (1), and we should be able to see the included extension (2).
Specifying a specific version
You can also specify the exact version of your extension as follows:
vscode:
  extensions:
    - dvirtz.parquet-viewer@2.2.2
The 2.2.2 behind the @ specifies the version.
To find the name of your extension,
you can look at its URL: https://open-vsx.org/extension/dvirtz/parquet-viewer.
These always start with https://open-vsx.org/extension,
after that you find the organization dvirtz and name parquet-viewer of the extension.
The extension ID always uses the pattern: <organisation>.<name>.
Installing an apt package
To install a custom apt package,
you can use the buildSteps section of the ide.yaml.
Installing apt packages is just one of the things that are possible using the build steps,
you can run any bash command you want here.
An example of a more complex bash script can be found in the section Installing a custom tool using bash.
To get started, create or modify the ide.yaml file in the root of your project:
buildSteps:
  - name: Installing htop
    cmd: |
      sudo apt update
      sudo apt install htop -y
As you can see, each build step needs to provide two keys:
name: The name of the build stepcmd: The script you want to execute, in this example we install an apt package
We can use conveyor ide create --env dev, to launch a customized IDE that will include the installed apt package.
As said before, this creates a customized image, which is cached, and will launch an IDE using that image.
After this we can open a terminal in our IDE and use the htop command in the terminal.
Installing a custom tool using bash
As we alluded to in the section on installing an apt package, you can use the build steps to execute scripts to modify your IDE.
To get started, create or modify the ide.yaml file in the root of your project:
buildSteps:
  - name: Install pyenv
    cmd: |
      curl https://pyenv.run | bash

      # Add to bashrc
      echo 'export PYENV_ROOT="$HOME/.pyenv"' >> ~/.bashrc
      echo 'command -v pyenv >/dev/null || export PATH="$PYENV_ROOT/bin:$PATH"' >> ~/.bashrc
      echo 'eval "$(pyenv init -)"' >> ~/.bashrc

      # Add to profile
      echo 'export PYENV_ROOT="$HOME/.pyenv"' >> ~/.profile
      echo 'command -v pyenv >/dev/null || export PATH="$PYENV_ROOT/bin:$PATH"' >> ~/.profile
      echo 'eval "$(pyenv init -)"' >> ~/.profile
The script installs pyenv, and adds the necessary environment variables to your bash profile.
Under the hood the string passed to cmd, is translated into a bash script that is executed.
You can use conveyor ide create --env dev, to launch your customized IDE.
This command creates a customized image, which is cached, and will launch an IDE using that image.
After this you can open a terminal in your IDE and use the pyenv command from the terminal.
Running tasks at IDE startup
As Conveyor does not have access to your Git repositories, any action involving your source code cannot be defined using build steps (e.g. installing a requirements.txt file).
When the IDE starts up,
the git-credentials-oauth tool is used to ask for your credentials before cloning your (private) Git repository.
When the cloning is complete, the root directory of your Git repository will automatically open inside VS Code,
and you can start working in your IDE.
VS Code provides the tasks mechanism
to automatically run custom tasks when your workspace is opened.
You can add a tasks.json file in your source code in the <project-root-dir>/.vscode directory,
which will be automatically detected by VS Code.
Common tasks that can be specified in tasks.json are:
- Installing a virtual environment for Python projects
- Installing a requirements.txt file with Python dependencies
- Exporting environment variables loaded from a secrets vault
- ...
An example tasks.json for a dbt project could look as follows:
{
  "version": "2.0.0",
  "tasks": [
    {
      "label": "Setting up the virtual env",
      "type": "shell",
      "command": "echo 'installing the virtual env' && make install",
      "presentation": {
        "reveal": "always",
        "panel": "new"
      },
      "runOptions": {
        "runOn": "folderOpen"
      }
    },
    {
      "label": "Install dpt deps",
      "type": "shell",
      "command": ". venv/bin/activate && dbt deps",
      "runOptions": {
        "runOn": "folderOpen"
      },
      "dependsOn": [
        "Setting up the virtual env"
      ]
    }
  ]
}
Here we create a virtual environment and start using it.
Additionally, we also download the most recent version of the dbt dependencies,
which are specified in the packages.yml file.
Through this mechanism, you can thus automate steps that otherwise would need to be executed manually when starting your IDE.
The runOn: folderOpen option specifies that the task should be executed when the root git directory is opened in VS Code.
Conveyor opens the root folder automatically after the git repo has been successfully cloned.
Customize VS Code settings
VS Code has many configuration options to tweak the look and feel of the online editor.
Every configuration option can be viewed in the ui by navigating to File > Preferences > Settings.
The active settings is a combination of the different scopes,
each with its own settings.json file, that exist in VS Code.
The most import scopes are:
- Workspace settings: settings that are configured on a project level and are added to source control.
- User settings: settings that are specific for a user and are shared across all vscode instances.
- Machine settings: settings that are specific to the Conveyor IDE environment that is launched.
There is a hierarchy between these settings, which is described by the VS Code settings documentation.
Project-specific settings
If you want to customize the IDE for a given project,
you can include a settings.json in the .vscode folder in the root of your project.
These settings can then be used by every user of the project.
User-specific settings
Conveyor also supports adding user-specific settings. These settings are tied to a user and are shared across all IDEs that the user creates and they take precedence over project-specific settings. Typically, these settings are used to configure the look and feel of IDEs (e.g. shortcuts, theme,...). You can configure these settings in Conveyor using the following methods:
- CLI: you can update your user setting by running:
conveyor user update-settings --ide file://<path-to-settings.json-file> - UI: on the IDE overview page, click on the
User settingsbutton and upload the file containing your user-specific configuration. The page looks as follows:
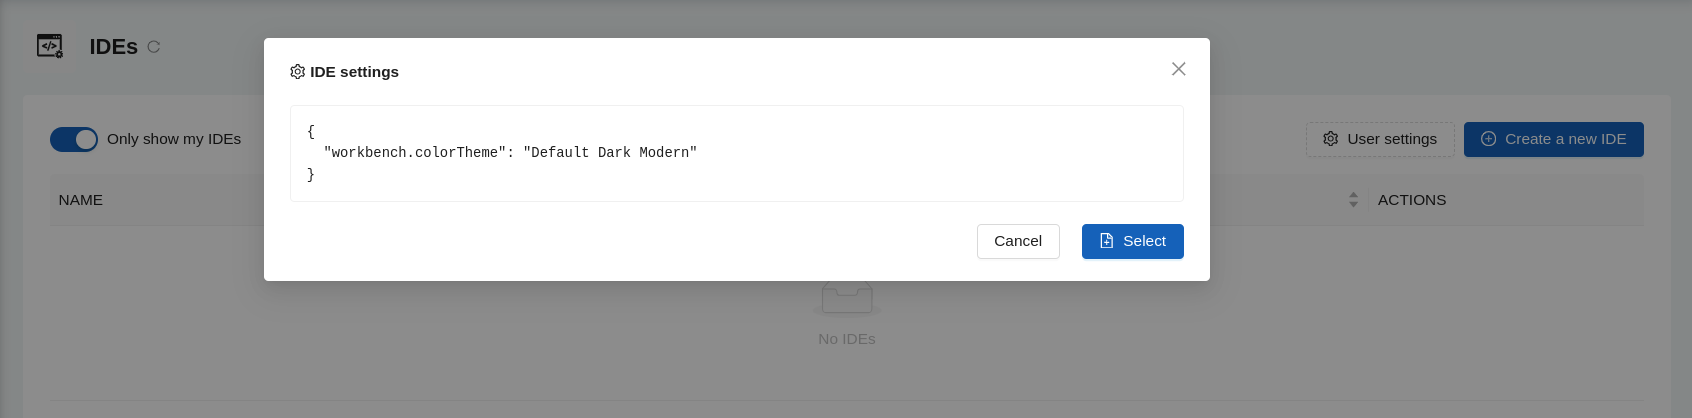
Include your custom settings.json file to overwrite project-specific settings for you specifically.
The easiest way to alter user settings is through the user settings editor in the VS Code UI as described in their docs.
When you are happy with the configuration, you can open the user settings.json file in the VS Code UI and copy-paste
the json content in the user-settings of Conveyor.
Debugging your buildSteps
If you want to do some extensive customization in the buildSteps, it's helpful to get some feedback about what went wrong in case of a step failing.
The Conveyor CLI provides the conveyor ide cache command,
which allows you to trigger a rebuild of your IDE image.
This command has two properties that are useful for debugging or iteratively developing your IDE configuration:
- It constructs the image based on the
ide.yamlfile - It streams the build logs back to your console
This means you can iteratively construct your buildSteps in the ide.yaml,
trigger a build when you want to test your changes using the ide cache command and then inspect the output.
When you're satisfied with your setup, you can commit your ide.yaml to your Git repository
and/or update the default IDE config of your project by executing conveyor project update --default-ide-config ide.yaml.