Launching an IDE
Launching the IDE
An IDE is always created in the context of a project and an environment. To launch an IDE, navigate to the directory of a project you checked out locally. Inside the directory, you can run the following command to create your IDE:
conveyor ide create --env YOURENV
This will launch an IDE with the default settings for your project and environment. You can always find all the available settings using:
conveyor ide create --help
The most important settings are:
--env, the environment we should launch your IDE on, this determines which AWS role and Azure application client id you can use.--aws-role, this flag describes the AWS role attached to your IDE.--azure-application-client-id, the Azure Application ID attached to your IDE.--instance-type, the instance type that the IDE should use.
There is no --instance-lifecycle flag, at the moment an IDE is always launched on an on-demand node.
If your project is configured with a Git URL, we will attempt to automatically clone your repository, saving you some keystrokes. You can verify the Git URL for a project using:
- CLI:
conveyor project get -o jsonfrom the root of your project - UI: click on the settings tab for a given project
The underlying mechanism remains the same as with manually cloning a repository, which is described in the next section.
Philosophy of working with IDEs
For Conveyor IDEs are a temporary working environment, which are created with a specific goal in mind like:
- Developing a new feature
- Debugging a specific issue
- ...
To accomplish this goal you create or checkout an already existing codebase and start working. After your work is finished, you push your changes such that you can delete the IDE. This way you can always start from a clean working environment for the next feature and you don't have to worry about cleaning up your environment.
All your work should be saved in Git and you can configure your IDE to run specific commands when starting up such that you should not reuse the same IDE over and over again. Rather, we advise to create a new IDE for each new task you start on.
With this philosophy in mind, we also delete suspended IDEs after 14 days. Apart from the philosophy that was already mentioned, this also helps with:
- making sure you have the latest software, patches and functionality available as provided by Conveyor
- keeping the costs low
Cloning a public repo
After your IDE is launched, you can clone your code in the IDE. We support cloning repositories over HTTPS, so for example for the conveyor-samples GitHub repo, you can use the following command to clone the repository:
git clone https://github.com/datamindedbe/conveyor-samples.git
After cloning, you can open this folder using the command line:
code-server -r conveyor-samples
Alternatively, you can use the UI as well. Click on the folder icon on the left, and then on "open folder" to open the cloned project.
Cloning a private repo
Cloning a private repository requires you to be logged in and authenticated. Conveyor provides an automatic way to login using an OAuth application to simplify the process when using the SaaS version of GitHub, Gitlab, Bitbucket or Azure DevOps. If you are using a self-hosted version of one of these platforms, please have a look at our guide for setting up a custom Git integration with your IDE.
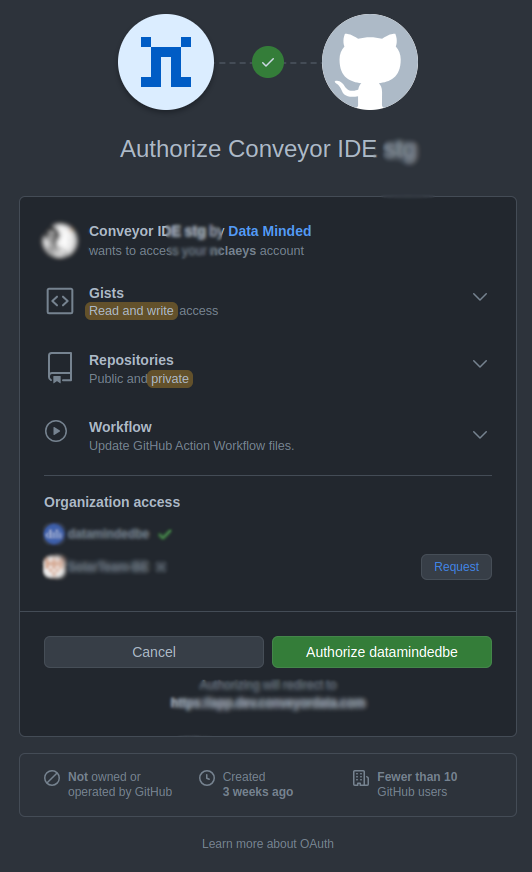
When doing a first checkout, you might see a screen pop up like this:

When you look at the URL, you'll see that the application is attempting to log in to GitHub. When cloning a repository from a different Git provider, Conveyor will log in to the corresponding provider, ensuring smooth interaction with most major Git platforms.
To continue the tutorial, please click the Configure Trusted Domains,
and select the option Trust https://github.com as pictured:

After logging in, we will continue on to github.com. The first time you will need to give permissions to enable the Conveyor IDE to retrieve a temporary OAuth token. This token will later be used to access the code repository.
 .
.
If you would like to learn how to customize your IDE, you can continue with this tutorial.
Attach an IAM identity to your IDE
You can launch an ide with an AWS role or an Azure application client id, which defines permissions available from an IDE.
For more details on how to set up the permissions, take a look at the following pages:
When an IDE has an identity attached, it is most of the time automatically picked up when executing code using the
The same applies for when you want to use the AWS CLI or the Azure CLI in your IDEs.
- The AWS CLI will automatically pick up the correct credentials from the IDE. You can thus immediately run any command to access AWS resources.
- The Azure CLI does not automatically pick up the IDE credentials,
which is why we provide the
azloginalias to simplify using the Azure CLI. After runningazlogin, you can execute any command to access Azure resources.
If you want to use your own credentials in Azure, you need to use the az login --use-device-code command.
This allows you to copy the device token in the CLI.
The default login does not work in a cloud IDE as it redirects to localhost instead of the cloud IDE.
Suspending your IDE
As IDEs run inside your cloud account, there will be associated costs while they are active.
To keep costs as low as possible, Conveyor will automatically suspend an IDE when there has been no activity for 60 minutes.
When creating an IDE you can change the waiting time before suspending using the max-idle-minutes setting in the UI or CLI.
When an IDE is suspended, a snapshot of its current state is created,
allowing you to resume your work from where you left off later on.
We also provide the option to manually suspend an IDE whenever you prefer:
conveyor ide suspend
This command will suspend your IDE, the state can be viewed using:
conveyor ide list
To continue your work at a later time, you can use the following command to resume your IDE:
conveyor ide resume
Once the IDE is ready, it will be automatically opened in your browser.
Suspended state
When an IDE is suspended, all changes you made in the IDE will be saved. This includes your code changes and packages installed with apt. You can also use Git from within the IDE to push your code to a remote repository at any time, saving your work that way.
In order to limit storage space used by suspended IDEs, we do not persist certain directories:
- Docker images built inside the IDE
- The
.cachedirectory in the home folder. This directory is used by various tools to store temporary files.
Current limitations
At the moment, IDEs ship with a minimal amount of pre-installed software. This means that components such as Spark will not work out of the box (as they do in the notebooks).
You can make use of the buildSteps mechanism,
as explained in Customizing your IDE,
to install the necessary tools for your IDE.
In order to build IDEs with more pre-installed software, you can also use the IDE base image, as explained in the IDE base image documentation.